
We've been working on the the New CMS (Content Management System) for a few weeks and it's starting to work like a real webapp, but we haven't really decided on a layout and UI, so, at the moment, it's only basic forms and pages. Let's start looking at the UI and layout to decide what the Admin users will interact with.
User eXperience (UX) & Design
Before we get into the UI, we need to be aware this is not the User eXperience (UX), this is the User Interface and layout. This article and this phase of the project is about what the user will interact with, rather than how the user will get from one state of the CMS to another. We will look at the UX at a later date, but for now we want to concentrate on the basic functionality and allowing the Admin user to do things on the system, rather than worrying about the "is there a better way?".
When we look at the UX we will look at how the user moves around the system and we change it accordingly. This project is being built with MVP (Minimum Viable Product) in mind, so we get it working first so it can be used in real world. We can go back and update and change as needed.
The design of the CMS will be completely functional at this point in the project, we have not looked at design, brand or even colours. We haven't even come up with a name yet (although the project is called "Two Dogs CMS"), so design will follow along with the UX at a later date.
Library
We must decide on the UI library we are going to use (if we use one at all). A UI library will have all the basic parts of the User Interface ready built and allows a developer to simply call the parts they need and use them. The library will need 'tweaking' to get the parts working together in the layout chosen, but ultimately should work out of the box.
Sometimes, it's best to create a UI Library from scratch, but in this case we will use one ready to go, to speed things up.
Be aware, the UI library may be removed and changed to another library if the one chosen is not fit for purpose, but we will do a some research into requirements and this is the kind of thing we need:
- Works with React and Next.js
- Basic styles of HTML elements
- Row and Column layout
- Simple Navigation
- Allows Separation of Concerns (SoC)
- Allows overrides of the styles for design
These are really the most important requirements for a project like this, but there are others depending on the person working on the system e.g.
- Developer - code and ease of use
- Architect - how it works with the rest of the system
- Project Manager - time and ease of to updating
- Operations - performance hit
- Designer - ability to change the look and feel
We have looked into this before in our Frontend UI libraries Article and doing a little more research did not find anything new. The choice is Bootstrap React or MUI
However, there is a major future requirement that we need to look at, we will need Frontend Templates for the CMS that can be created and uploaded while the system is running, so looking at the 2 libraries, Bootstrap React is the one to choose as it will allow CSS only templates. We may even have the opportunity to purchase Bootstrap Templates and plug them right in.
Architecture
We now have to look at how we add in the library and any overrides for the library?
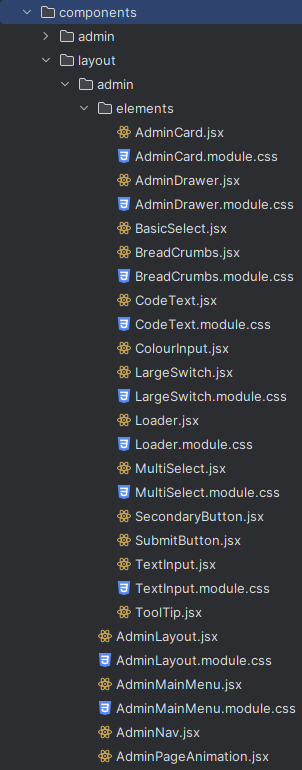
Our structure is simple at the moment, we have a `components` folder that has a folder called `layout`, then a folder called `admin` which will hold ALL `elements` for the UI.
The admin folder will hold the:
- AdminLayout - Bring together everything needed for the Admin Layout.
- AdminMainMenu - Layout and code to make the Main Menu work for all resolutions and sizes.
- AdminNav - Schema for the navigation, sub navigation and icons plus the permission needed to view (we will look at this in another article).
- AdminPageAnimation - Will control the exit and enter animations for pages
The elements folder will hold all of the elements that make up the forms and pages for the admin and will include things like:
- Card - renders a card for a card layout page
- Drawer - Part of the layout on some pages (see later)
- Select - Basic HTML select box
- ToolTip - Show a more information on hover
- Loader - Layout to show before the content loads in
There will be many other elements to go in here as you can see from the image on the right we've already added a few more.
We also have a styles/global.css file so we can override the main layout with the design later.
Layout
For our layout we are going to need:
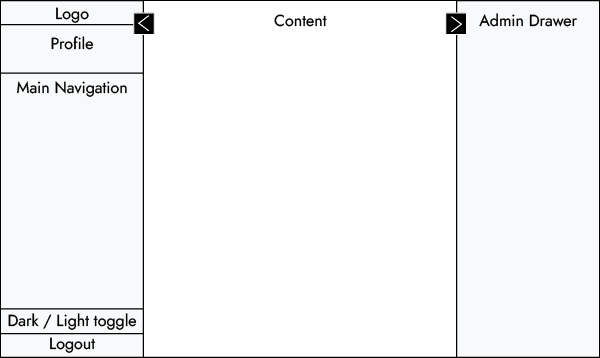
- A left menu, that is:
- large for desktop (with a button to make it smaller) that is next to the content, not over it.
- hidden for mobile, with a button to open it.
- A Drawer on the right that is always hidden but on a click of a button slides out over the content. This is not on every page, only pages with extra configuration e.g. Show soft deleted
- A 'back to top' that is shown only as the user scrolls down and shows how far the user has scrolled
- Buttons for logging out, dark/light toggle and profile button.
As you can see by the image above there is no design, the MVP is about getting something working then adding to it. Once we have the responsive layout working and all buttons doing exactly what they should then we can look at design.
Creating a system in this way allows the graphic designers to com up with a design while the developers make it work and everyone is working to the same layout.
Adding the Layout and User Interface
We want all pages under Admin to see the Admin Layout and all other pages (presentation) to see the template (we've not looked at this yet). In our Admin Layout we add a <Container /> component, then we add the <AdminMainMenu />,the <Animation />, <ScrollToTop />, <ToastNotification /> and <ModalNotification /> components.
Once we have these in, looking correct and working for the different resolutions, we can add the changes using the user controlled buttons and saving to the local store as we need e.g. if the user chooses the dark or light version and if the menus are open are closed.
We also need to take care of the loading states and bring in the <Loader /> to hide the content that is not loaded. Lastly we animate the pages as they change.
This gives us the UI, but we need to only show the UI for the Admin side so using the _app.js file (we are using Next.js with the page router) we add a check for the if we are in the admin side or the client side with:
const getLayout = (page) => {
    if (router.pathname.startsWith('/admin')) {
        return <AdminLayout>{page}</AdminLayout>;
    }
    return <Layout>{page}</Layout>;
};
For this we make sure the /admin route is for admin only so we will start with the admin template for Admin then later we will 'gate' admin so it is protected.
We now have all pages under /admin showing with the <AdminLayout /> and anything else has the <Layout />.
Tables
Now we have a layout for our Admin and the elements we can build any forms or pages from, but we are missing a key element. Some pages on the Admin are built with Cards that have a title, description and some other information, but most pages are built with tables.
The tables will have sort, filter, actions for buttons like edit or delete, pagination and the ability to hide or show some columns.
Client Side
To do this the simple way, we can get all the data on page load, then format it into a table witch is called client side. This is fine for up to a few hundred rows, but if there are thousands of rows, this is extremely wasteful as the user may only want the first few rows and can slow the app down by seconds or even minutes. Worse, the app can crash or become unresponsive when there is over around 5,000 rows depending on the frontend. Lastly, getting this many rows every time can cost.
Server Side
The more difficult way is to use the API (we'll look at his in another article) to only get the rows we need at the time we need them. The means the API must deal with pagination, number of rows, sorting ascending and descending and filtering. Then we format the rows coming back as a table. We also need to show buttons for sorting, filter box for searching/filtering, next/back and number of pages and a number of items per page.
Both of these will look and work the same to a user, but the client side version will take longer for initial load and be almost instant for changes and server side will be a little slower for changes, but faster for initial load. Server side will also save the app crashing so is a must have. Right now, the API is not complete, so we will use the simple client side table first, but once we have the API we will use the server side tables.
We could do a count and if we have under 5,000 rows use client side, but over use server side. This looks and feels wrong for the user when tables act a little different and isn't great for developers having to make changes to 2 different types so we will go for 1 or the other and server side is the 'best' option here.
For the tables we will use Tanstack Table as it will work with our API well and will save some of the work we will need to complete.
Wrapping it up
We now have a full Layout and a User Interface we can put together using the elements we need and we can create new elements as we need. We also have the ability to override with a new design should we need. Add this to our Schema and our aggregation layer and we have the scaffold of a solid webapp.
In the next article will look at our authentication and Roles & Permissions.
As usual, if you have any questions or issues please comment below or contact us.